
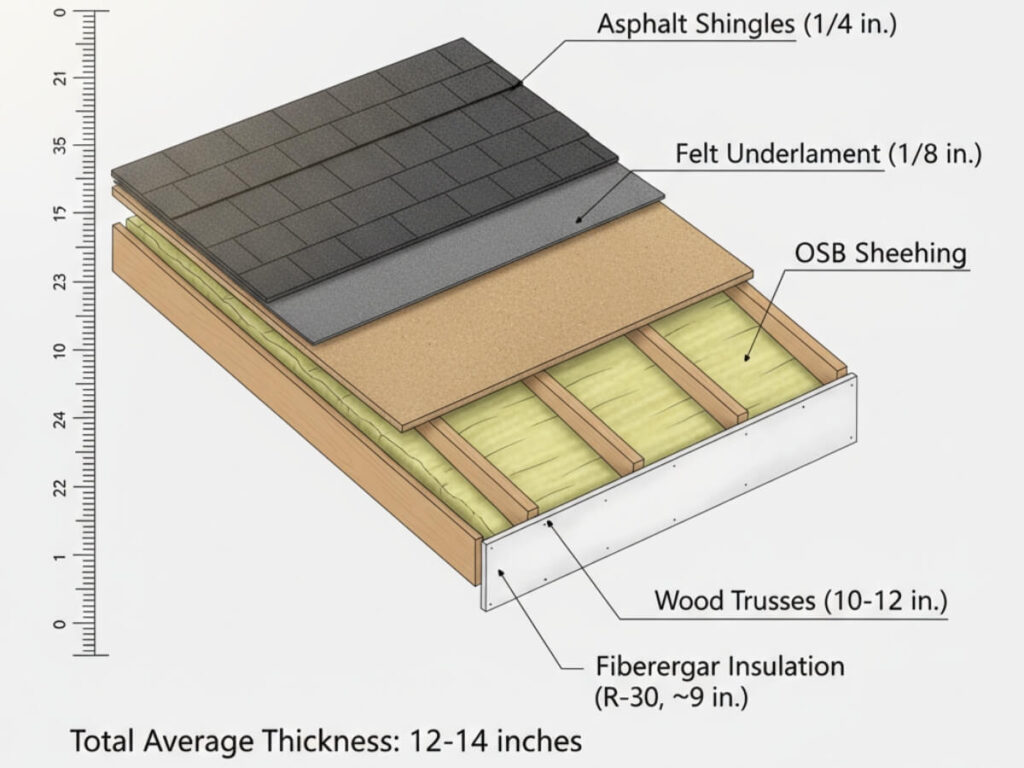
A roof’s “thickness” is not a single number—it’s the combined depth of several layers that work together to keep weather out and comfort in. Most homes include a structural deck, moisture barriers, ventilation space, insulation, and the visible roof covering. Depending on materials and climate goals, total assemblies can range from a few inches to well over a foot. Low-slope systems may look slim but hide substantial insulation. Steep-slope roofs can appear bulky due to shingles or tiles. Understanding how each layer adds strength, weather protection, fire resistance, and energy efficiency will help you plan repairs or upgrades with confidence.
Understanding Roof Thickness
What “Roof Thickness” Really Means
Thickness is the sum of all components from the top of your ceiling to the outer roof surface. A typical assembly includes framing, sheathing (OSB or plywood), an underlayment or membrane, a ventilation channel or air space, insulation, and the final covering (shingle, metal, tile, slate, or membrane). Each layer has a job: structure, water shedding, vapor control, heat retention, and UV protection. Codes, climate, and budget steer how thick each part becomes. The result is a system, not a single measurement, which is why two homes on the same street can differ substantially.
Typical Residential Assemblies By Roof Type
Steep-slope roofs with asphalt shingles usually combine 7/16–3/4 in (11–19 mm) sheathing, thin underlayment, optional ice barriers, and shingles roughly several millimeters thick, plus attic insulation measured in inches. Metal roofs often use similar decks with slimmer panels but may add battens or vented spaces for noise and heat control. Tile or slate systems appear thicker due to the profile of the units and required support elements. Low-slope roofs may look minimal, yet they frequently carry several inches of rigid insulation beneath EPDM, TPO, or PVC membranes to hit energy targets.
Codes, Climate, And Energy Rules Affect Thickness
Local code sets minimum structural thickness for decks and establishes required fire classifications. Climate pushes the insulation layer thicker in cold regions and may require ice-dam protection at eaves. Hot and sunny areas lean on reflective surfaces and vented assemblies to limit heat. Energy codes specify insulation performance (R-value), which translates into added inches. High-wind or wildfire zones influence covering choices, fasteners, and underlayment types. Historic districts or HOA guidelines can also determine allowable profiles. Together, these rules mean “the right thickness” is the combination that meets safety, durability, efficiency, and neighborhood requirements.
Layer-by-layer Thickness Guide
Roof Deck (Sheathing)
The deck spans rafters or trusses and provides the structural base. Most homes use OSB or plywood in the 7/16–3/4 in range (about 11–19 mm). Heavier loads, wider rafter spacing, or tile/slate coverings may push toward the thicker end. Proper nailing patterns are as important as thickness.
Underlayment (Felt Or Synthetic)
Underlayment is a secondary water-shedding layer beneath shingles or metal. Traditional felt is thin yet effective; modern synthetics are also slim but offer higher tear resistance. Thickness is measured in mils or grams per square meter, adding moisture security without meaningfully increasing overall profile.
Ice And Water Shield (Self-adhered Membrane)
This peel-and-stick layer seals around nails at leak-prone areas—eaves, valleys, skylights, and chimneys. It contributes little visual bulk but meaningfully boosts water resistance and ice-dam protection. In cold climates, codes often require it from the eave to a point above the exterior wall.
Ventilation And Air Space
Vented assemblies improve shingle life and reduce heat buildup. Ridge and soffit vents create airflow, while baffles carve an air channel above insulation. The “thickness” here is the air gap itself—often about an inch—small in dimension but big in performance for moisture and temperature control.
Final Roof Covering (Profile)
Shingles, metal panels, tiles, or slate define the visible profile. Architectural shingles are thicker than three-tab. Metal panels are slim yet strong. Tiles and slate present the highest profile and demand a supporting structure. The covering adds limited structural depth but sets the roof’s appearance and water shedding.
Material-Specific Thickness Snapshots
Asphalt Shingle Systems
The assembly is modest in visual thickness but robust in layers. Decking, underlayment, and shingles combine with attic insulation below. Architectural shingles add profile and shadow lines without huge depth. In cold regions, ice-dam membranes plus generous attic insulation increase total assembly thickness to cut heat loss.
Standing Seam Metal Roofs
Metal panels are thin yet durable. Their crisp seams add minimal height while protecting against wind-driven rain. Beneath, high-temp underlayments and slip sheets help with expansion. Assemblies may include vented battens or above-sheathing ventilation to limit heat gain, increasing depth slightly while improving comfort and efficiency.
Clay And Concrete Tile Roofs
Tiles are substantial in profile and weight. Battens elevate tiles for drainage and alignment, creating a thicker, ventilated layer above the underlayment. The structure must support the load, often requiring specific deck thickness and fastening patterns. The overall depth appears larger but delivers excellent durability and fire performance.
Wood Shake And Shingle Roofs
Wood shakes are thicker and more textured than wood shingles, creating distinctive shadow lines. They’re often installed over spaced sheathing or on battens to promote drying, which increases total thickness. Modern codes typically require fire-rated underlayment’s or treatments, adding protection while preserving the classic look.
Low-slope Membrane Roofs (EPDM/TPO/PVC)
These systems look thin from the outside because the membrane is only millimeters thick. The hidden bulk is the insulation board—often several inches—to achieve code-required R-values. Cover boards add durability under foot traffic. The result is a slim profile with a surprisingly deep thermal layer below.
Fastening Systems: How They Change Roof Thickness
Nails & Screws
Fasteners like galvanized nails are used to secure each roof layer. Their length is based on the total roof thickness and must penetrate base decking for stability.
Ridges & Edges
Ridge caps and drip edges add to the edge profile, sometimes increasing total roof height by a half-inch or more. These areas are key to weatherproofing and aesthetic appeal.
Hips and Valleys
Special trims at hips and valleys can add thickness in these specific locations, ensuring watertight seals in the most vulnerable roof areas.
Multiple Layers Over Time
Sometimes, new roofing layers are installed over old roofs to avoid a full tear-off. This can increase total thickness by 1 to 2 inches.
Roof-to-Wall Transitions
Where the roof meets walls, step flashing and underlayment layers contribute additional thickness for leak protection and improved weather tightness.
How To Evaluate Your Roof At Home (Practical Steps)
- Peek at the attic: measure insulation depth with a ruler and note ventilation baffles. Compare against local energy guidance to see if you’re under-insulated.
- Check eaves and drip edges: stacked layers (membranes, starter courses) hint at a robust assembly; missing metals or wrinkled underlayment suggest weak points.
- Look for material profile: architectural shingles, tile, or slate show thicker shadows; metal profiles are slimmer. Profile alone doesn’t reveal R-value—verify insulation separately.
- Review decking clues: nail patterns and sagging between rafters imply deck stiffness; uneven planes can indicate thin or failing sheathing needing assessment.
- Photograph and document: capture close-ups at penetrations, valleys, and ridges. Pros can infer layers from photos and recommend upgrades without immediate tear-off.
Conclusion: Protect Your Home With Intercrus Roofing
Roof thickness is really system design—structure, barriers, ventilation, insulation, and the visible surface working together. The “right” depth depends on your climate, code requirements, energy goals, and chosen material. A slim-looking metal roof can outperform a bulky assembly if the hidden layers are engineered well. Likewise, a classic shingle roof can gain years of life with proper ventilation and ice protection. If you’re planning repairs, re-roofing, or a material change, start with a whole-assembly review: deck condition, underlayments, ventilation path, insulation level, and finish profile. Small adjustments at each layer often deliver big gains in durability and comfort.
Intercrus Roofing helps homeowners answer the core question—how thick should your roof be—by assessing structure, airflow, moisture risk, and energy targets, then recommending an assembly that meets local rules and maximizes value. We install shingles, metal, tile, slate, and low-slope membranes with careful attention to the hidden layers that make the difference. Ready to plan a roof that looks great and performs even better? Contact Intercrus Roofing for a clear, step-by-step proposal and a roof system built to last.